Milgard window replacement involves careful adherence to specific installation guidelines, often detailed in comprehensive guides available from distributors and Milgard itself․
Understanding these instructions, including those for aluminum windows, is crucial for a successful and energy-efficient installation process․
Understanding the Scope of Installation
Milgard window installation isn’t simply swapping old for new; it’s a multifaceted process demanding meticulous attention to detail․ The scope extends beyond the window itself, encompassing proper rough opening preparation, crucial flashing techniques, and secure fastening․
Each window style—aluminum, vinyl, or otherwise—may necessitate slightly different approaches, emphasizing the need to consult specific Milgard guides․ A thorough understanding involves recognizing that every installation is unique, potentially differing from standard procedures․
Furthermore, assessing existing conditions, like gaps in the rough opening, is vital before commencing work․ Proper installation ensures not only aesthetic appeal but also long-term energy efficiency and structural integrity, avoiding future issues․
Tools and Materials Checklist
A successful Milgard window replacement begins with a comprehensive toolkit․ Essential tools include a drill for pilot holes and screw installation, alongside appropriate drill bits․ Measuring tools – a tape measure and level – are paramount for accurate placement․
Materials needed encompass 14x 8 x 2 zinc coated flat head wood screws for securing the frame, flashing tape for weatherproofing, and a high-quality caulk for air sealing․
Don’t forget utility knives for trimming flashing, safety glasses, and potentially foam application materials (though some installers avoid foam, addressing gaps differently)․ Accessing Milgard’s installation guides will confirm specific material requirements for your chosen window type․
Preparing the Rough Opening
Milgard installation requires a thorough rough opening preparation, involving the complete removal of the existing window and a detailed inspection for necessary repairs․
Removing the Old Window
Carefully dismantle the existing window unit, starting with the removal of any interior trim or casing․ Proceed to disconnect and remove the old window from the rough opening, taking caution to avoid damaging the surrounding structure․ Note any existing gaps or conditions within the rough opening, as these will inform subsequent repair work․
Pay attention to how the previous window was secured – noting screw locations and types can be helpful․ Thoroughly clear the opening of all debris, old insulation, and remnants of the previous window’s installation materials․ A clean and unobstructed rough opening is essential for a proper Milgard window installation, ensuring a secure fit and optimal performance․ Documenting the existing conditions with photos can also be beneficial․
Inspecting and Repairing the Rough Opening
Thoroughly inspect the rough opening for any signs of rot, damage, or structural issues․ Address any deficiencies before proceeding with the Milgard window installation․ Repair or replace damaged wood framing, ensuring a solid and level surface for the new window․ Existing gaps, noted during old window removal, should be evaluated – the installer observed these gaps were present in the previous unit and weren’t filled․
Ensure the opening is square and plumb; shimming may be necessary to correct any irregularities․ A properly prepared rough opening is critical for a weather-tight and structurally sound installation․ Correcting these issues now prevents future problems and maximizes the window’s energy efficiency and longevity․

Milgard Window Flashing: A Critical Step
Proper flashing is essential for preventing water intrusion during Milgard window installation, utilizing specific types and techniques for optimal weather protection․
Types of Milgard Window Flashing
Milgard windows necessitate careful consideration of flashing types to ensure a watertight seal․ While specific details depend on the window style and installation context, understanding available options is paramount․ The provided documentation highlights the importance of adhering to Milgard’s recommended flashing methods․
Generally, flashing materials include flexible flashing tapes and potentially integrated flashing systems within the window frame itself․ These systems are designed to divert water away from the rough opening․ It’s crucial to consult the specific installation guide for your Milgard window model, as recommendations can vary․
Furthermore, the guides emphasize that every window is unique, and these guidelines may not universally apply․ Always prioritize the instructions provided with your specific Milgard product for the most accurate and effective flashing approach․
Correct Flashing Installation Techniques
Milgard window installation demands meticulous flashing techniques to prevent water intrusion․ Proper application involves creating a continuous barrier around the window opening, overlapping flashing materials at seams to ensure a watertight seal․ The guides stress the importance of following Milgard’s specific recommendations for each window style․
A common technique involves applying flashing tape to the sill, jambs, and head of the rough opening before window insertion․ Overlap is critical, and attention to detail is paramount․ Ensure the flashing integrates seamlessly with the window’s integrated flashing, if applicable․
Remember, every window is unique, so always refer to the specific installation instructions provided with your Milgard product․ Incorrect flashing can lead to significant water damage, so prioritize accuracy and adherence to best practices․

Window Placement and Initial Securing
Milgard windows require careful positioning within the prepared opening, followed by temporary bracing to maintain alignment during the securing process for stability․
Positioning the Window in the Opening
Carefully maneuver the Milgard window into the rough opening, ensuring it’s centered and aligned with the finished wall dimensions․ Gentle handling prevents damage to the frame or glass․ Check for a consistent gap around all sides – this is vital for proper insulation and flashing․
Confirm the window’s sill is level using a spirit level; shims may be needed under the sill or jambs to achieve perfect leveling․ A level installation is paramount for smooth operation and weather tightness․ Before proceeding, double-check that all components are correctly oriented according to the Milgard installation guide specific to your window style․
Remember, every window is unique, so referencing the specific instructions is essential․ Proper positioning now avoids complications later in the installation process․
Temporary Bracing and Leveling
Once positioned, temporarily brace the Milgard window within the rough opening to maintain its alignment; Utilize wooden blocks or shims strategically placed against the window frame and the surrounding rough framing․ This prevents shifting during the securing phase․
Re-check the window for plumb, level, and squareness – adjustments can be made by adding or removing shims as needed․ Pay close attention to the sill; a level sill is critical for proper water drainage․ Ensure the bracing doesn’t obstruct screw placement later on․
Consistent leveling at this stage guarantees optimal window performance and prevents future operational issues․ Refer to the Milgard guide for specific bracing recommendations based on window size and style․

Securing the Window Frame
Utilize 14x 8 x 2 zinc-coated flat head wood screws, driven through the L bracket and into the rough opening, to firmly secure the frame․
Screw Placement and Quantity (14x 8 x 2 zinc coated flat head wood screws)
Proper screw placement is vital for a secure Milgard window installation․ Drive QTY 14x 8 x 2 zinc coated flat head wood screws through the L bracket directly into the rough opening framing․
Ensure a consistent pattern, with 3-5 screws positioned on either side of the interior mounting reveal (IMR)․ Prior to screw insertion, drilling a small hole through the side jamb, followed by a larger hole through the wall – sized to accommodate the screw head – is recommended․
This technique facilitates easier screw driving and prevents wood splitting․ Consistent spacing and sufficient screw quantity guarantee the window frame is firmly anchored, contributing to long-term stability and performance․
Drilling Pilot Holes for Screw Installation
Before driving the 14x 8 x 2 zinc coated flat head wood screws, carefully drill pilot holes to ensure smooth installation and prevent damage to the window frame or surrounding structure․
Begin by drilling a smaller diameter hole through the window’s side jamb․ Subsequently, drill a larger diameter hole – sized appropriately for the screw head – through the first wall layer․
This two-step process allows for easier screw insertion, minimizes the risk of wood splitting, and provides a secure connection between the window frame and the rough opening․ Accurate pilot hole placement is crucial for optimal screw engagement and long-term window stability․

Insulation and Air Sealing
Air sealing is achieved by applying caulk around the window fin, utilizing tape on both sides to ensure a clean, precise bead—foam may not be used․
Foam Application (or lack thereof ⎯ gap considerations)
Interestingly, the installation process often foregoes the use of foam insulation․ The installer noted a significant gap existed in the original window installation, and this space wasn’t filled or furred in previously․
This approach suggests that Milgard’s installation methodology doesn’t necessarily rely on expanding foam to create a tight seal․ Instead, the focus is on precise fitting and robust air sealing techniques, like careful caulking․
The absence of foam can be a deliberate design choice, potentially addressing concerns about over-expansion causing window frame distortion or creating unwanted pressure․ Proper gap assessment is vital; if substantial voids exist, addressing them structurally before installation might be necessary, but foam isn’t automatically applied․

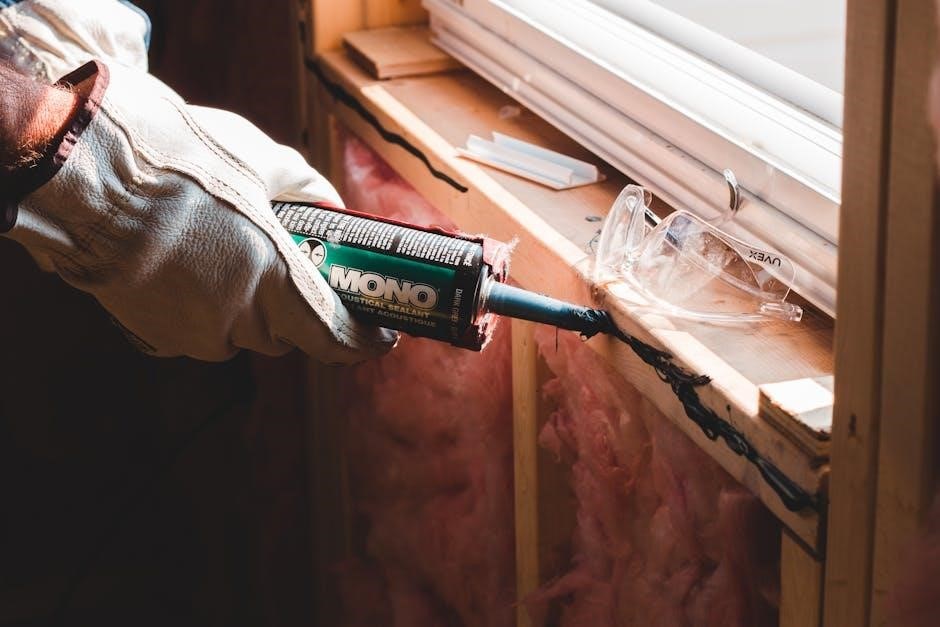
Caulk Application Around Window Fin (with tape)
A key element of Milgard window installation involves a specific caulking technique designed for optimal sealing․ The recommended method centers around applying tape to both sides of the window fin – essentially creating a protective barrier․
Then, a bead of caulk is meticulously applied around the tape, not directly onto the window fin itself․ This technique ensures a clean, controlled caulk line and prevents any potential damage or residue on the window’s exterior finish․
The tape acts as a guide, allowing for a precise and professional application, maximizing the effectiveness of the sealant and creating a watertight barrier against the elements․ Removing the tape immediately after application yields a smooth, finished look․
Finishing Touches and Interior Trim
Interior trim installation completes the Milgard window replacement, followed by careful caulking of any remaining interior gaps for a polished, airtight finish․
Installing Interior Trim
Proper interior trim installation is a key finishing step after a Milgard window replacement, ensuring both aesthetic appeal and a secure seal․ Begin by measuring and cutting the trim pieces to precisely fit the window opening, accounting for any slight irregularities in the wall․
Mitered corners create a professional look, and using a high-quality wood filler can conceal nail holes and imperfections․ Secure the trim using finishing nails, carefully avoiding contact with the window frame itself․
Consider the existing interior style when selecting trim profiles, aiming for a cohesive design․ Finally, a light sanding prepares the trim for painting or staining, completing the interior finishing process and enhancing the overall appearance of the newly installed Milgard window․
Caulking Interior Gaps
After installing the interior trim, meticulously caulk any remaining gaps between the trim and the window frame or wall․ This step is vital for preventing drafts and moisture intrusion, contributing to energy efficiency and protecting the window installation․
Use a high-quality, paintable caulk specifically designed for interior applications․ Apply a consistent bead of caulk, ensuring it fills the gap completely without being excessive․
Smooth the caulk line with a wet finger or a caulking tool for a professional finish․ Allow the caulk to dry completely before painting, and choose a caulk color that matches the trim or wall for a seamless appearance․ This final sealing step ensures a long-lasting and weather-tight window installation․

Milgard Window Specific Installation Guides
Milgard offers detailed guides for aluminum windows and 3-part windows, accessible through distributors; these resources are essential for proper installation techniques․

Aluminum Window Installation Guide
Milgard’s aluminum window installation requires precise execution, referencing the dedicated 6-page installation guide for optimal results․ This guide details crucial steps, ensuring a weather-tight and structurally sound installation․ It emphasizes the importance of securing the window frame using 14x 8 x 2 zinc-coated flat head wood screws, driven through the L bracket into the rough opening – typically 3-5 screws on either side of the IMR (Integrated Mounting Rail)․
Prior to screw installation, drilling pilot holes, with a larger hole for the screw head, is recommended․ The guide stresses that every window is unique, and these instructions may need adaptation based on the specific window style․ Always consult your Milgard distributor for a current copy of these vital installation instructions, as practices can evolve․
3-Part Window Specification Details
Milgard’s 3-Part Window Specifications, documented across 12 pages for aluminum windows, are essential for installers․ These details outline precise requirements for proper installation, ensuring adherence to performance standards and warranty validity․ The specifications cover aspects like frame dimensions, glazing options, and structural integrity, directly impacting the installation process․
A key element involves the securement of the window frame using 14x 8 x 2 zinc-coated flat head wood screws, strategically placed through the L bracket into the rough opening․ Understanding these specifications, alongside the broader installation guide, is vital for a successful project․ Referencing these documents guarantees a quality installation aligned with Milgard’s engineering standards․